Changing the door rope on your woodburner
What you need to know to maintain a good door seal on your wood burning stove
All stoves work in part by restricting the amount of air that can enter the combustion chamber. The controls allow you to regulate the air supply to establish or revive a fire or to keep it burning at optimal efficiency. This ability to control the stove depends on an effective door seal.
To achieve this, the doors are fitted with a tightly-woven, heat-resistant synthetic gasket that compresses slightly when the door is closed, creating a sufficiently air-tight seal to ensure efficient and controllable stove operation.
Over many hundreds of opening and closings of the stove door, this rope can begin to fray or otherwise disintegrate, or compress to such a degree that it no longer forms an effective seal. At this point, it is necessary to change the rope.
How to tell if your stove rope needs changing?
Sometimes your stove will tell you! If you notice that the controls are starting to become unresponsive and you can’t slow the fire down, it’s likely that you have air leaking into the stove and that leak is probably through the door. Often, you’ll see a change in the flame pattern if there’s a gap in the door seal, or possibly increased deposits on the glass where the leaking air is countering your stove’s airwash.
Alternatively, do the paper test. (When the stove is cold!) close the door on a sheet of paper (at different points around the door) and see if you can pull it out. It should be stuck or stiff to pull out. If it comes out easily, it means your door seal is not effective and it’s time to change the rope.
Which kind of stove rope should I buy?
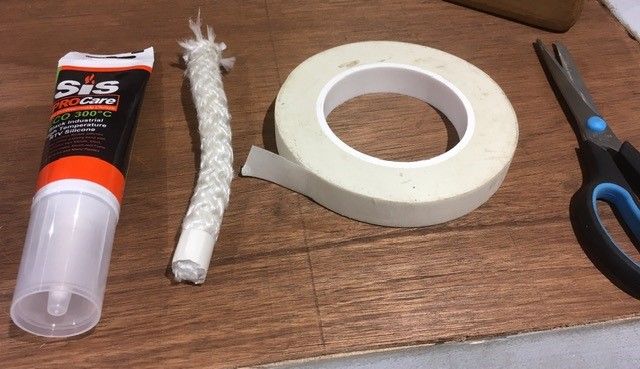
While a handful of stove manufacturers use uniquely specialised door rope, which needs to be bought from them, most choose instead to use generic stove rope in one of a few standard rope diameters. Most manufacturers will sell proprietary replacement rope kits, with the correct type, diameter and length of rope, bound at the ends to prevent fraying and with a tube of adhesive to glue it into place. This is definitely the easiest and most foolproof way of getting replacement rope for your stove, but it is also relatively expensive.
You can also buy generic stove rope from stove shops like ours by the metre, along with glue and the tape to bind the cut ends. This usually works out about half the price, but you will need to be sure of what you are buying.
Stove rope comes in different diameters – usually from 8mm to 14mm, but occasionally smaller or wider – and either soft or firm. Firm rope – as the name suggests! – feels much firmer and has a maximum compression of something like fifty percent. Soft ropes squidge down to a much flatter profile, so it is important to select the right type. Too firm and the door won’t close. Too soft and it won’t form an effective seal.
Likewise, it is important to get the right diameter: the rope fits into a groove in the metal door, the radius of which is designed for a specific size of rope. If your stove instruction book doesn’t tell you which rope to buy, you should be able to call the manufacturer and ask them. Some, like Chilli Penguin, helpfully flag up all the necessary information on the maintenance section of their website. If you have a serial number for the stove, or a date of purchase, this can be helpful to them in identifying the precise model of the stove that you have (because over time they sometimes make changes), and thus the correct spare parts.
Failing this, you can take out the old rope and measure it if it’s in good enough condition, or take a sample down to your local stove shop to compare with the ropes they have on the reel.
A note on glue: you can buy small tubes of thin, clear stove glue. Even better is proper high-temperature silicone mastic.
The rope itself might be white or grey. The colour doesn’t mean anything and doesn’t make any difference.
How to change the door rope on your stove
Typically, you will need to lift the door off its hinges and lay it face down on a soft surface. Not only is it easier to work on the door like this, but it will put less strain on the hinges and remove the influence of gravity on your new rope while the glue dries.
As with most unfamiliar tasks, it’s always a good idea before starting to take a picture on your phone of what the door and rope look like before you start taking it to pieces. If it’s your first time changing the rope, it’s a also good idea to try to duplicate the pattern and exact position in which the manufacturer fitted the rope in the first place.
First you will need to dig out the old rope and pull it all out. If there’s no loose section, use something with a blunt flat blade to pop a section out, then just pull. You will then need to clean out the channel in the door of any fragments of rope and the residue of the old adhesive. An old flathead screwdriver, a wire brush and some sandpaper should get the job done in no time.
When it’s clean and dust-free, lay your length of new rope into the groove until the whole length of the channel is filled. Try not to stretch or compress the rope unnaturally. When you can establish the correct length, cut off the excess rope. It’s best to leave a few extra millimetres as the cut ends will fray and you will need to trim them after taping them.
Bind the cut ends with stove tape – you won’t need much, once around is fine – then trim off the excess or cut back until you have two squared-off ends to butt up to each other.
Next you will need to run a continuous bead of adhesive through the channel, then gently and carefully bed the rope into it. Don’t worry if your section of rope suddenly seems slightly too long or short. While the glue is wet, you can concertina the rope back or stretch it forth until the two cut ends butt neatly up to one another. You can then add a dab of glue to the cut ends and fix them into place, then go back around the full circumference and ensure that the rope is properly bedded into the channel.
Take off any excess glue that might have splurged out of the channel. It’s important to clean up well as excess glue can adhere to the stove body after you’ve re-hung and closed the door and can pull the rope back out, which is very frustrating.
It's then best to leave the glue to firm up for a few hours before re-hanging the doors.
The heat from the first subsequent fire you have in the stove will fully cure the adhesive and it should then be a few years before you have to repeat the process.